Launching MVP with Automated Infrastructure: Packer AMIs, Terraform & AWS SSM
Introduction
Bringing a new product to life starts with launching a Minimum Viable Product (MVP) — an initial version that delivers core functionalities for early users while minimizing development time and cost.
I took on the challenge in this project: transforming the developers’ raw application code into a build system and publishing the service for initial testing in a reliable, scalable production environment. The goal was to automate infrastructure provisioning, create a custom AMI with Hashicorp Packer, deploy EC2 instances using Terraform, and manage them securely via AWS Systems Manager (SSM).
Application Overview
The application is built using a modern tech stack:
- Django (Python framework): Handles web application logic and API endpoints.
- NGINX: Acts as a reverse proxy, directing traffic efficiently.
- Gunicorn: Serves as the Web Server Gateway Interface (WSGI) to process HTTP requests for Django.
- PostgreSQL: A reliable, scalable database for storing authenticated user data

This comprehensive guide documents my journey through four crucial phases of infrastructure automation:
- Custom AMI Creation with HashiCorp Packer
- Bash Scripting for Automated Configuration
- Terraform Provisioning for Consistent Deployments
- Secure Management with AWS Systems Manager
Implementation: Automated AMI Creation and Deployment
The infrastructure automation follows two streamlined CI/CD workflows:
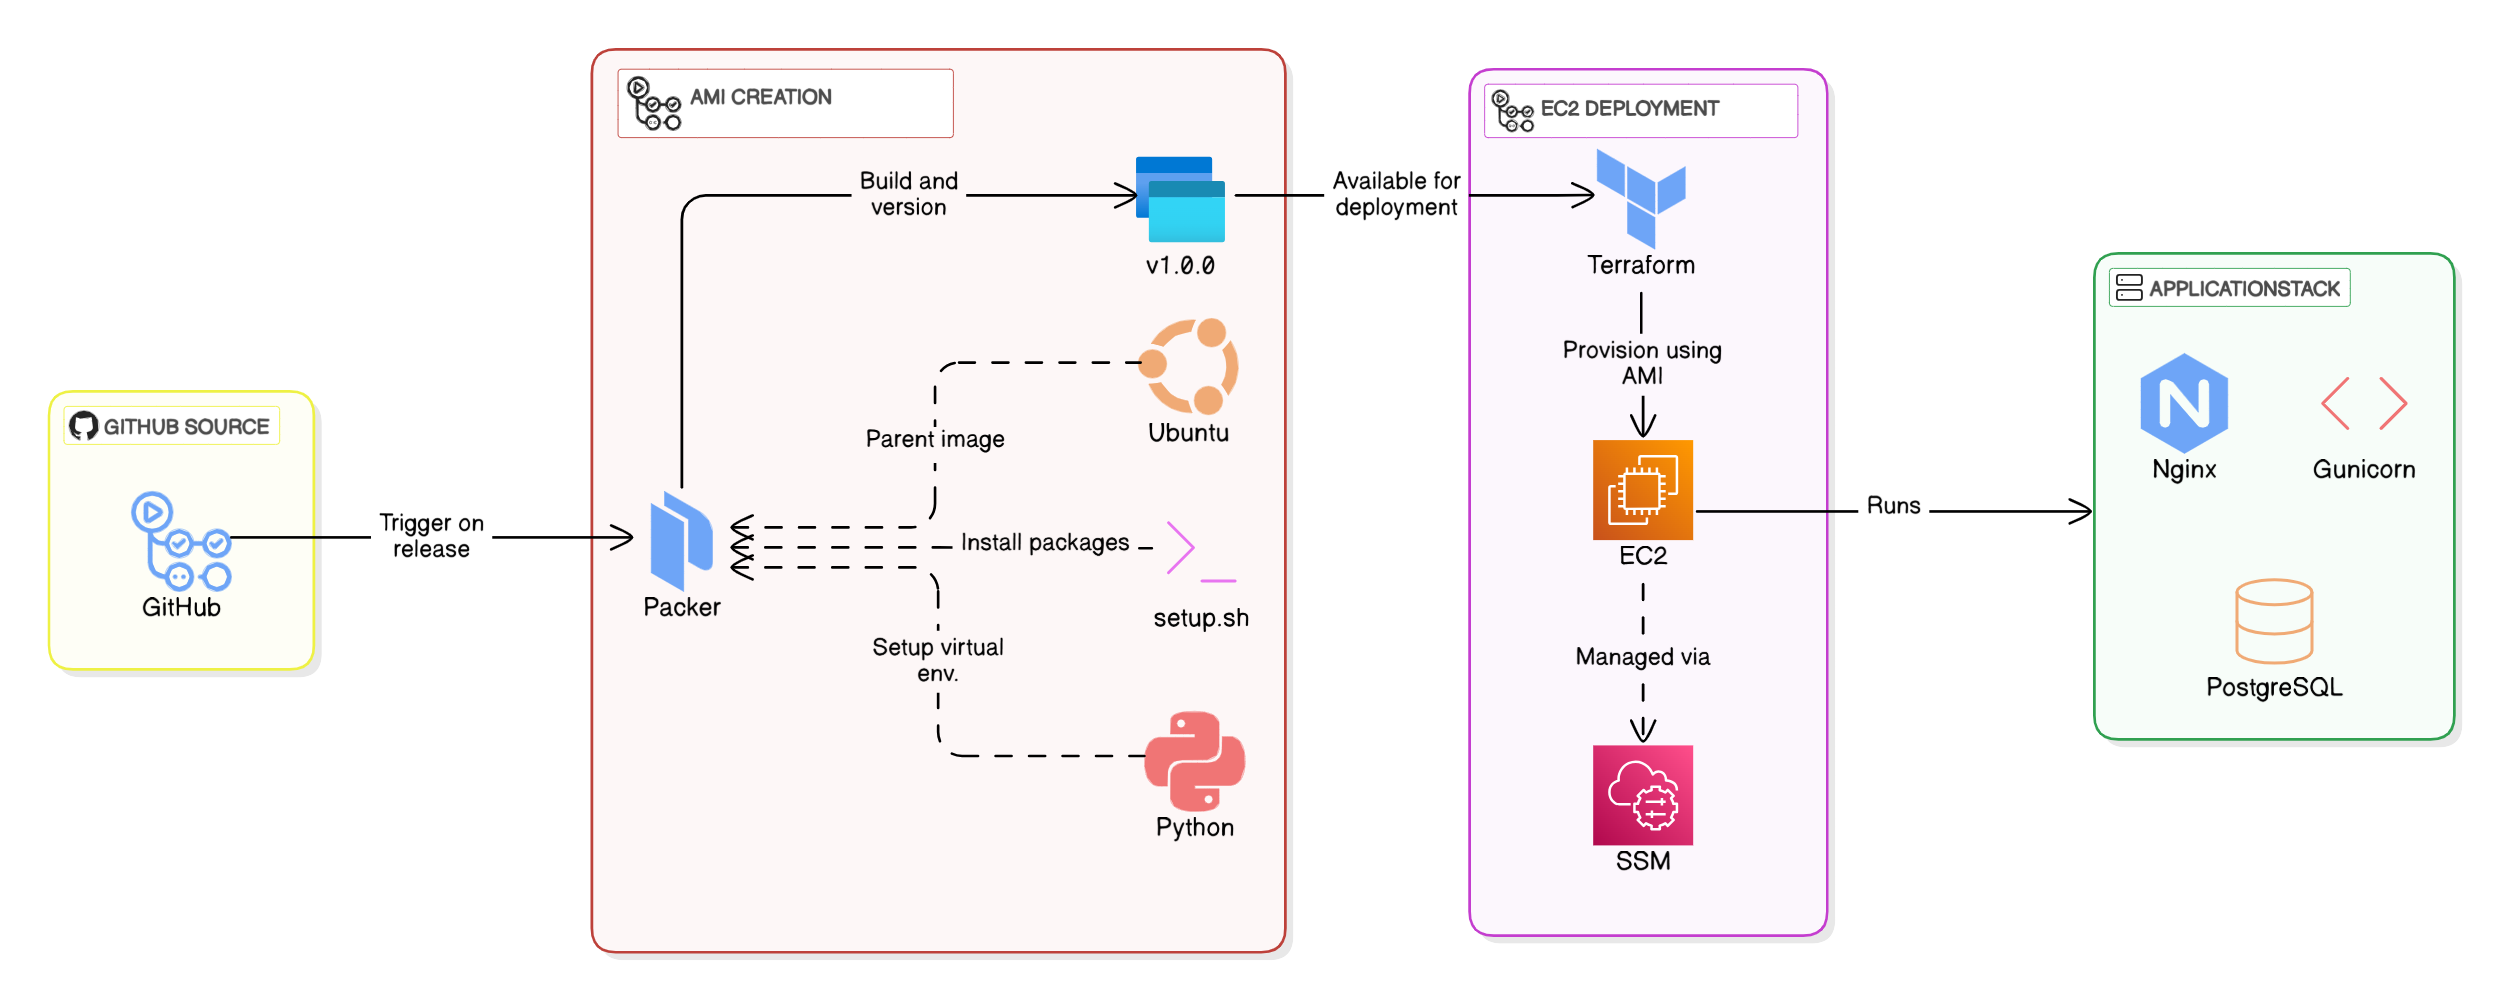
AMI Creation with Packer: This workflow builds an immutable Amazon Machine Image from a base Ubuntu image using a BASH provisioning script. The script automates the installation of all dependencies (including Python, Nginx, and PostgreSQL) and configures the runtime environment for our Django application. Triggered by GitHub releases, each AMI is versioned to match the release tag (e.g., v1.0.0), ensuring traceability and consistency.
EC2 Deployment with Terraform: Once the AMI is available, a separate workflow deploys EC2 instances using Terraform. The process is designed for reliability: instances launch with the pre-configured AMI, eliminating post-deployment setup steps. Manual triggers via workflow_dispatch allow controlled rollouts of specific AMI versions.
Why Packer? Immutable infrastructure is key to reducing configuration drift. By baking everything into the AMI — dependencies, application code, and even secrets — we ensure instances are production-ready upon launch. This approach also speeds up scaling; new instances inherit the same battle-tested environment without manual intervention.
Step 1: Building Custom AMIs with HashiCorp Packer
I created a custom Amazon Machine Image (AMI) using HashiCorp Packer to ensure consistent and reusable infrastructure. The process followed the “Image as Code” principle, enabling automated and repeatable AMI builds.
Steps Taken:
1. Configured the Packer Template:
- Used ubuntu-jammy-22.04-amd64-server as the base image.
- Configured the vpc_id, subnet_id, and associate_public_ip_address in the source block.
- Defined ssh_username as ubuntu for SSH access.
2. Added Versioning:
- Introduced a versioning variable (version), allowing AMI updates to be tracked using the naming convention fictitious-app-ami-vX.X.X.
3. Provisioned Application Code:
- Uploaded the repository contents to /tmp and moved the necessary files to /opt/app.
- Ensured the application setup script (setup.sh) is executable.
4. Optimized AMI Storage:
- Used the amazon-ami-management post-processor to retain only the last two AMI releases, reducing storage costs.
| |
5. Automated AMI Builds with GitHub Actions:
- Configured GitHub OIDC for authentication, eliminating static credentials.
- Created a workflow to trigger Packer builds on new GitHub releases.
- Injected sensitive credentials (SECRET_KEY, DB_USER, DB_PASSWORD) dynamically using a secrets.sh file.
| |
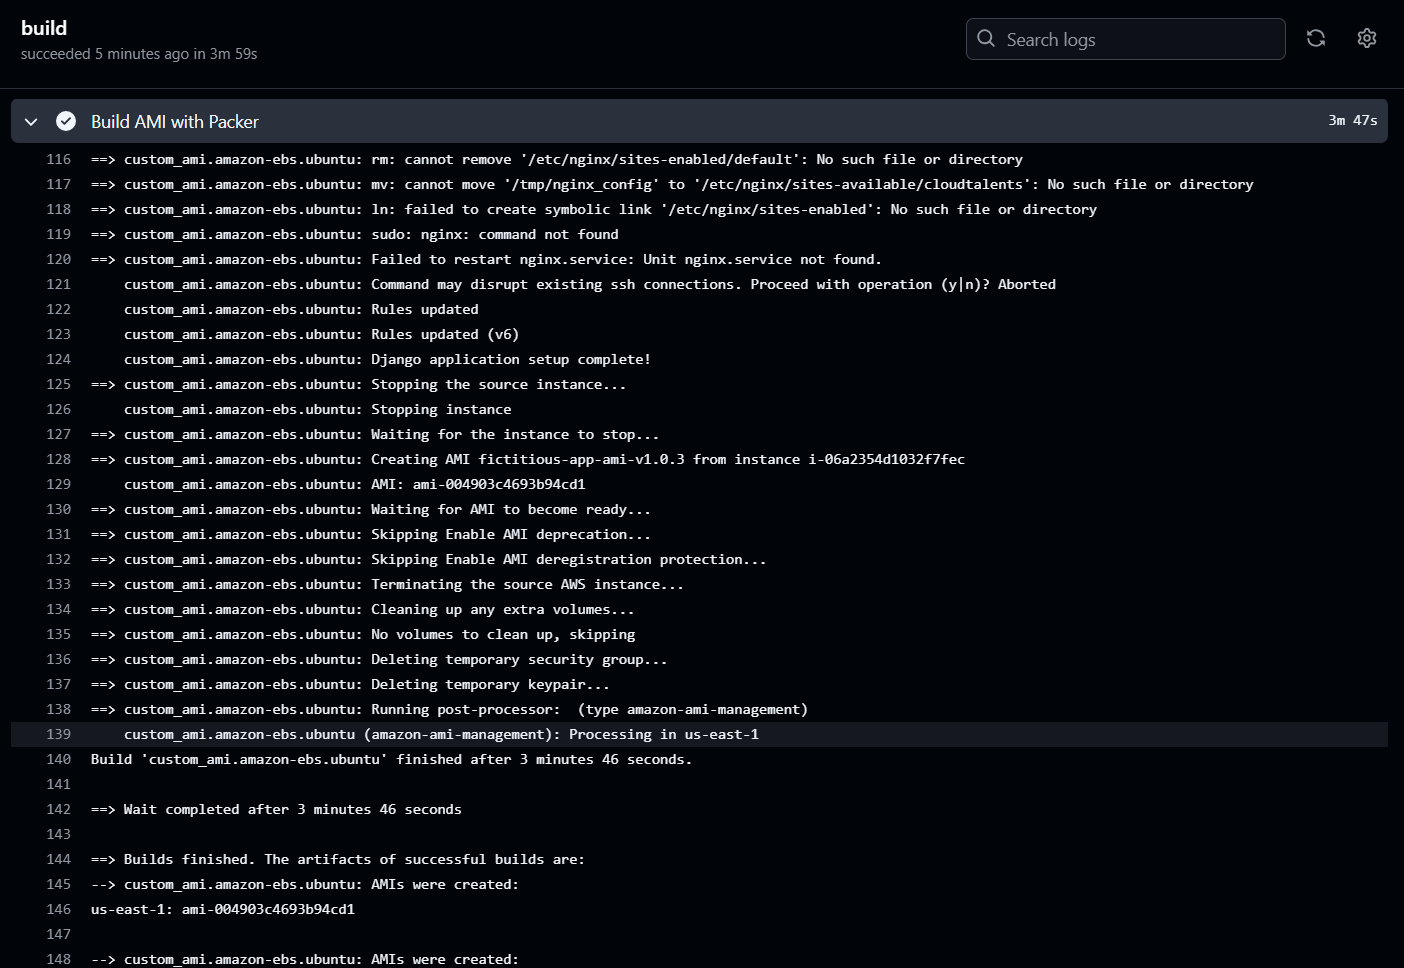
🚀Outcome:
- Successfully generated a custom AMI with application files and configurations.
- Established an automated, versioned, and cost-efficient AMI creation process.

Step 2: Launching EC2 Instances with Custom AMIs using Terraform
Once the AMI was ready, the next step was to launch an EC2 instance based on it. Using Terraform, I automated the deployment process.
Steps Taken:
1. Configured Terraform Variables & Outputs:
- Used remote state sharing to fetch VPC & subnet details.
- Defined ami_id as a required input variable to specify which AMI version to deploy.
2. Created EC2 Instance:
- Set t2.micro as the instance type (to stay within AWS Free Tier).
- Deployed in a public subnet with a public IP.
- Assigned a security group allowing inbound traffic on port 80 (HTTP).
3. Implemented a CI/CD Pipeline for Terraform:
- Created a GitHub Actions workflow to deploy Terraform infrastructure in us-east-1.
- Used OIDC integration to authenticate Terraform with AWS.
- Configured manual triggers using workflow_dispatch to deploy specific AMI versions.
| |
🚀 Outcome: EC2 instance was launched successfully with version-controlled AMIs.

Step 3: Securely Connecting to EC2 with AWS Systems Manager (SSM)
Since we aimed for a secure infrastructure, I configured AWS SSM for remote access, eliminating the need for SSH access.
Steps Taken:
1. Created an IAM Instance Profile:
- Attached AmazonSSMManagedInstanceCore policy to grant SSM access.
- Updated Terraform code to associate the IAM profile with the EC2 instance.
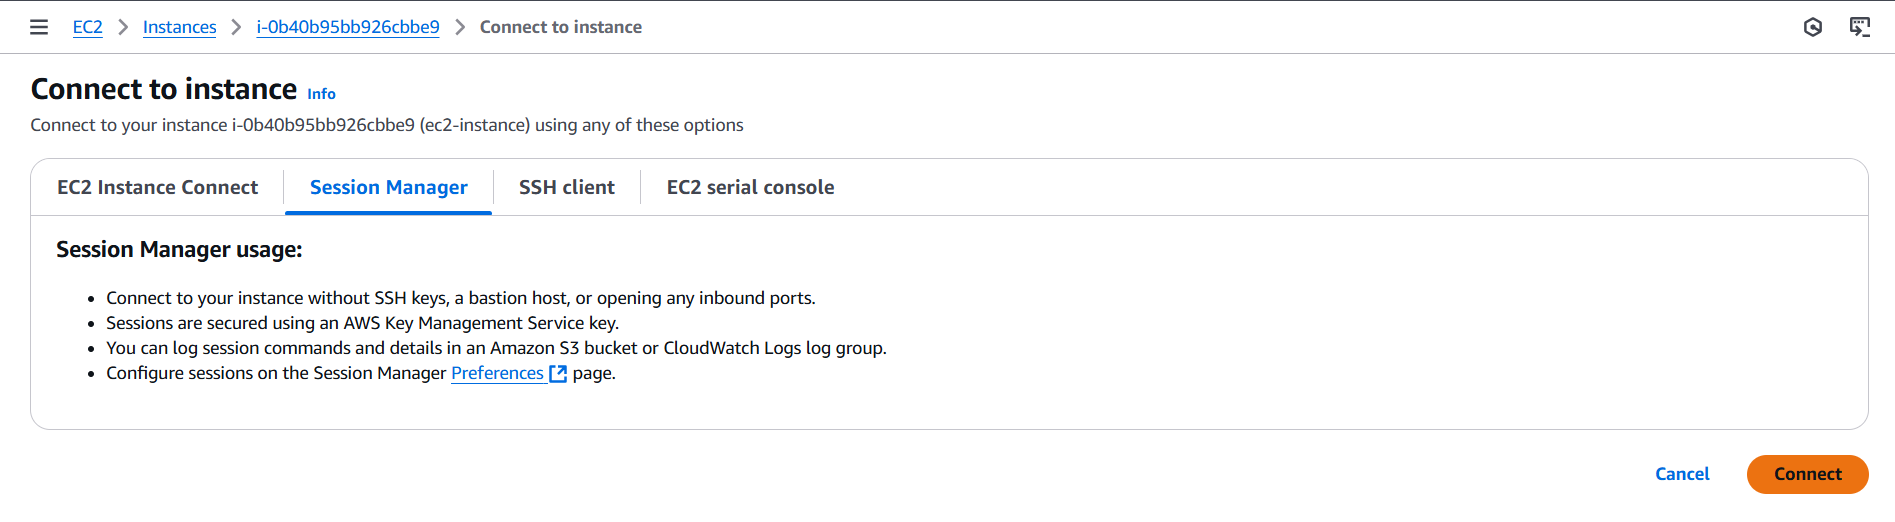
2. Connected to the Instance Using SSM:
- Used AWS Console Session Manager to establish a shell session.
- Ensured no additional inbound SSH ports were required.
🚀 Outcome: Secure, agent-based access to the instance without SSH, enhancing security.
Step 4: Configuring the AMI using Bash Scripting
To ensure a fully automated deployment process, I developed a Bash script (setup.sh) that pre-installs critical web application components directly into the AMI. This eliminates the need for post-launch manual configurations, streamlining the deployment of EC2 instances.
Key Components of the Setup:
- Django Framework: Serves as the backbone of the application.
- Gunicorn: Handles WSGI requests efficiently for the Django application.
- Nginx: Acts as a reverse proxy to route requests to Gunicorn.
- PostgreSQL: Provides a robust relational database backend.
- Python Virtual Environment: Isolates dependencies and maintains a clean environment for the application.
The script automates:
- Installing essential dependencies (Nginx, Gunicorn, PostgreSQL, and Python packages).
- Setting up a Python virtual environment and installing application dependencies from requirements.txt.
- Configuring Gunicorn as a systemd service to ensure application persistence.
- Deploying an Nginx configuration that proxies traffic to the Gunicorn service.
- Enabling firewall rules to allow HTTP traffic and secure database access.
🚀 Outcome: The new AMI was now fully configured out-of-the-box, reducing setup time for future deployments.
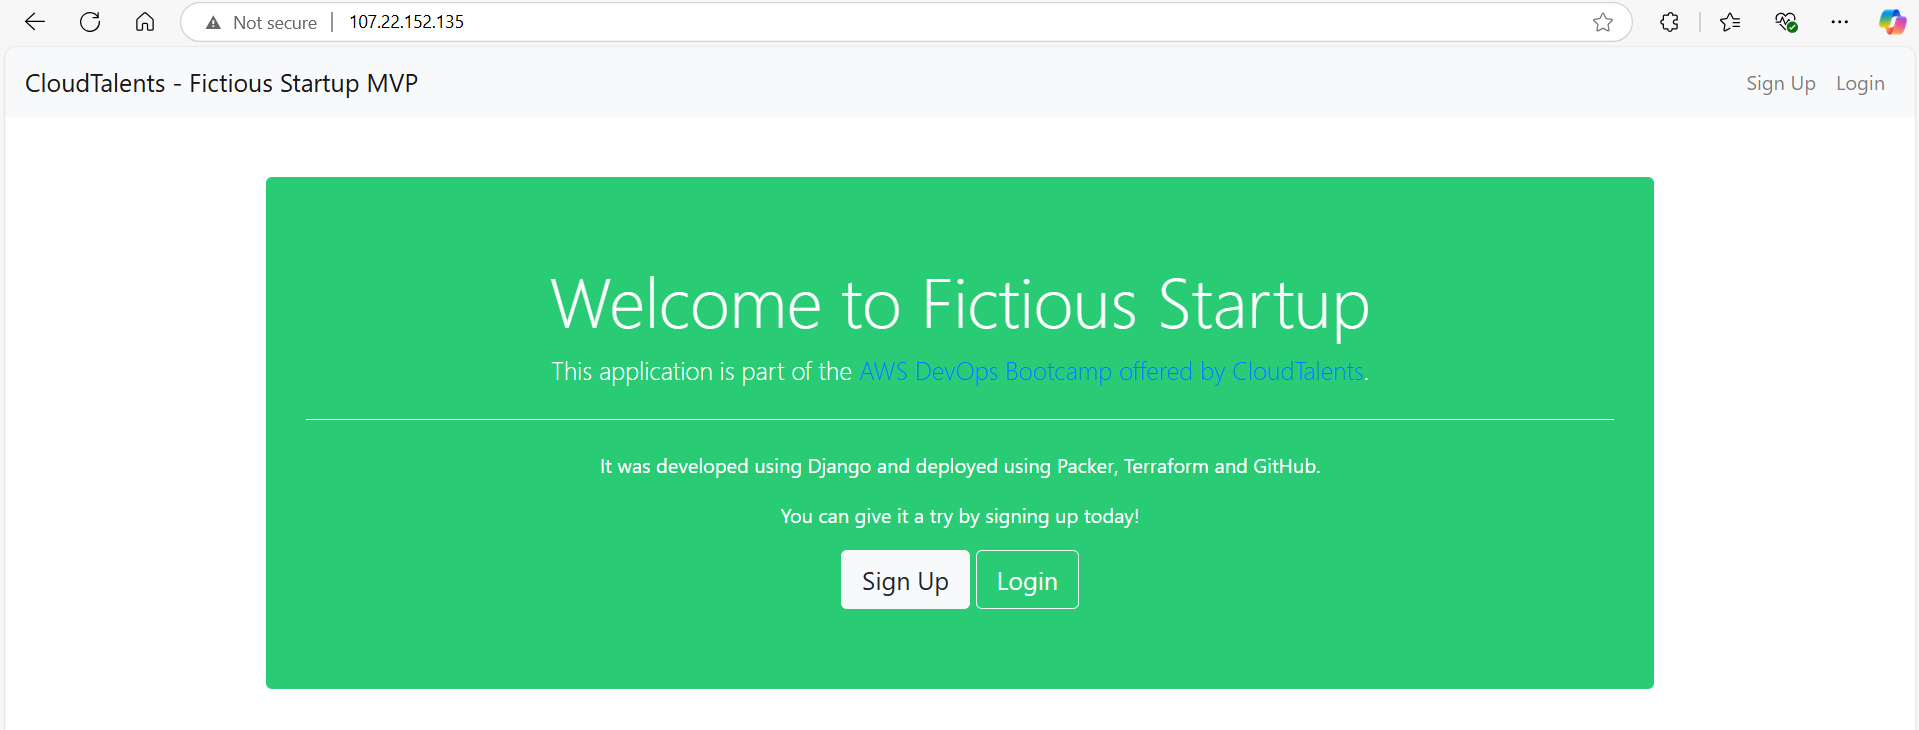
Final Test: Accessing the Application
With everything set up, I deployed the final AMI version and verified the application.
✅ Application is successfully running at http://INSTANCE_PUBLIC_IP 🎉
Key Takeaways:
- IAM Permissions: Setting up correct IAM policies is crucial for Packer, Terraform, and SSM.
- GitHub Actions for CI/CD: Automating builds and deployments speeds up iteration.
- Immutable Infrastructure: Packer AMIs ensure consistent environments from development to production.
- Version Pin Everything: Explicit versioning of AMIs and dependencies prevents “works on my machine” issues.
- Security First: Using SSM instead of SSH eliminates attack vectors and enhances access management.
- Automate Early: Manual processes tend to become bottlenecks; automating early ensures long-term scalability.
Conclusion
This pipeline transformed my deployment process from manual, error-prone steps to a fully automated workflow. By combining Packer’s immutable AMIs, Terraform’s infrastructure as code, and SSM’s secure access, I now deploy production-ready environments in minutes — not hours.